LVO Mission Report - Bunker Assault and Final thoughts
Bunker Assault
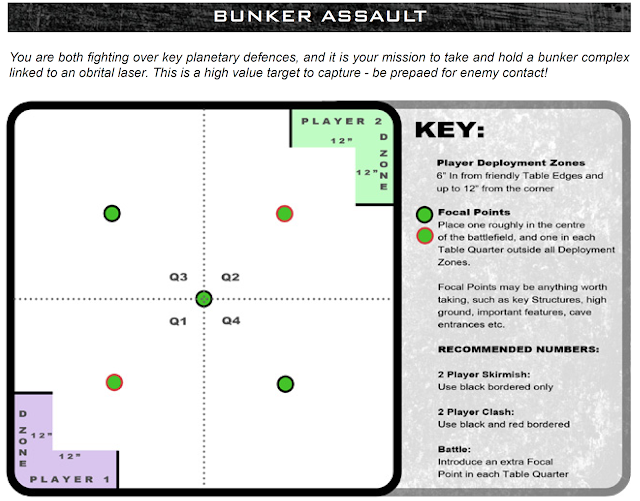
The last mission I would face would also be my savior from ending up in last place. My opponent brought a PHR demo force, however, in this mission the bunkers are indestructible. This made his largest battlegroup (the demo battlegroup) with nothing to do.
Also, the board was much more open that the other boards. This worked out great for my Ocelot and Panther with their infinite ranged weapons.
My opponent quickly took his quadrant's bunker with the demo battlegroup. I had several buildings that separated that battlegroup from the rest of my army. If he had destroyed those buildings then my army would have had a much worse time but he left them standing.
Side Note. His demo army did make me be more careful to my movements. Typically you move behind and building for cover with no thought to being too close to the building. But his demo group could easily down a building in one activation so I could easily lose a unit by a falling building.
My opponent dropped sirens on the other bunker on his side, my panther and ocelot planted themselves on my closest bunkers and then we began to slug it out for the center bunker.
My Jaguar fell to my opponents Medusa. My Gharial was just around the corner and was able to Flame the medusa. Flame ignores evasion countermeasures so I was able to cut down the medusa to almost half of her health and therefore effectively neuter her offensive capabilities. She retreated behind a building to get healing from her Triton X but my Warspear was able to come on the board, destroy her Triton X and then go to deck to avoid the Phobos AA shots he had in the back of his board.
My tomahawks and gharial all slugged it out against his Hera and Odins at the middle bunker. I eventually removed that battlegroup from the middle board. I ended up taking the middle bunkers and my back bunkers. I contested the other bunker on his side of his board and his medusa moved in at the last moment to contest the middle bunker.
With Kill Point bonuses I ended up as 15 - 5.
What I learned and overall thoughts.
CV is important. If not for the cards but to win initiative. I don't think particularly high of the Shaltari command cards and so I don't typically put in a large Commander and CV. But losing the initiative can really hurt if you happen to leave some units in the open and don't get a chance to move them back to safety.
Shaltari AA is weak and short ranged. They need to be positioned very well to do any good. Even repositioning them to take out light transports may be the better move rather then use them to take out big targets.
The Shaltari flexibility with their gates is a strength but also difficult to implement. You really have to be constantly moving your gates to better position them to threaten more of the table. Many times I forgot to move my gates only to kick myself when a golden opportunity came up but no gates anywhere near to move them.


Comments
Post a Comment